
How to Create a Coffee Station in a Small Kitchen
A useful coffee station does not need a dedicated cabinet, built-in bar, or generous stretch of countertop. In a small kitchen, the best setup is usually a tightly edited zone that keeps the machine, mugs, coffee, and daily tools together without taking over the room.
The key is to design around your actual routine. Choose the smallest practical location, keep only frequently used supplies within reach, and move backups elsewhere. Done well, a compact coffee station can make mornings easier while leaving enough work surface for cooking.
Start With the Coffee Routine, Not the Decor
Before buying organizers or clearing a corner, pay attention to how you make coffee. A pod machine needs different storage than an espresso machine with a grinder, tamper, scale, and milk pitcher. A pour-over setup may require a kettle, filters, dripper, beans, and a place to set a wet brewer after use.
List the items you touch during an ordinary morning. These are the supplies that deserve prime space. Occasional syrups, guest mugs, unopened coffee bags, seasonal flavors, and appliance manuals can live in a nearby cabinet or pantry.
Before you decide
- Which appliance or brewing method do you use most?
- Do you need access to water, refrigerated milk, or both?
- How does the machine open for refilling and cleaning?
- Which supplies are used daily rather than occasionally?
- How much counter space must remain available for food preparation?
This editing step matters because a coffee station becomes cluttered when it tries to store every mug, flavor, accessory, and backup bag in one small area. Think of the station as a working zone, not a complete inventory.
Choose a Location That Supports the Workflow
The most attractive corner is not always the most practical one. Start by identifying a grounded electrical outlet that is appropriate for the appliance, then consider access to water, milk, and a trash or compost container. Avoid relying on an extension cord or running a cord across a walkway, sink, or cooking area.
A counter near the refrigerator works well for people who regularly add milk or creamer. A spot near the sink simplifies filling a removable reservoir and rinsing tools. However, the station should not interfere with the main prep zone, crowd the cooktop, or block a cabinet door.
Check the full operating movement of the machine before committing. Lift the reservoir lid, remove the drip tray, swing open any side compartments, and simulate adding coffee. An appliance that technically fits beneath a wall cabinet may still be frustrating if it must be pulled forward every morning.
Give the Station a Clear Boundary
A defined footprint helps a coffee station look intentional and prevents it from spreading. A washable tray is an easy boundary for a machine, grinder, and canister. It also catches stray grounds and makes it easier to wipe the counter.
Choose a tray that fits the available surface without forcing the appliance too close to an edge. It should not trap heat, obstruct vents, or make the machine unstable. For appliances that release steam, use materials and nearby finishes that can tolerate routine moisture, and follow the manufacturer’s placement and clearance instructions.
A tray is not mandatory. The boundary could instead be one cabinet bay, a narrow section of countertop, the top of a rolling cart, or a shallow shelf above the machine. What matters is that every item has a defined home and the setup does not creep into neighboring work zones.
A small coffee station feels generous when the routine is complete but the inventory is restrained.
Use Vertical Space Without Creating Visual Clutter
Once the footprint is established, look upward. The cabinet above the machine is often the simplest place for mugs, filters, and unopened coffee. Shelf risers can create a second level inside a tall cabinet, while under-shelf baskets may hold lightweight items without requiring permanent installation.
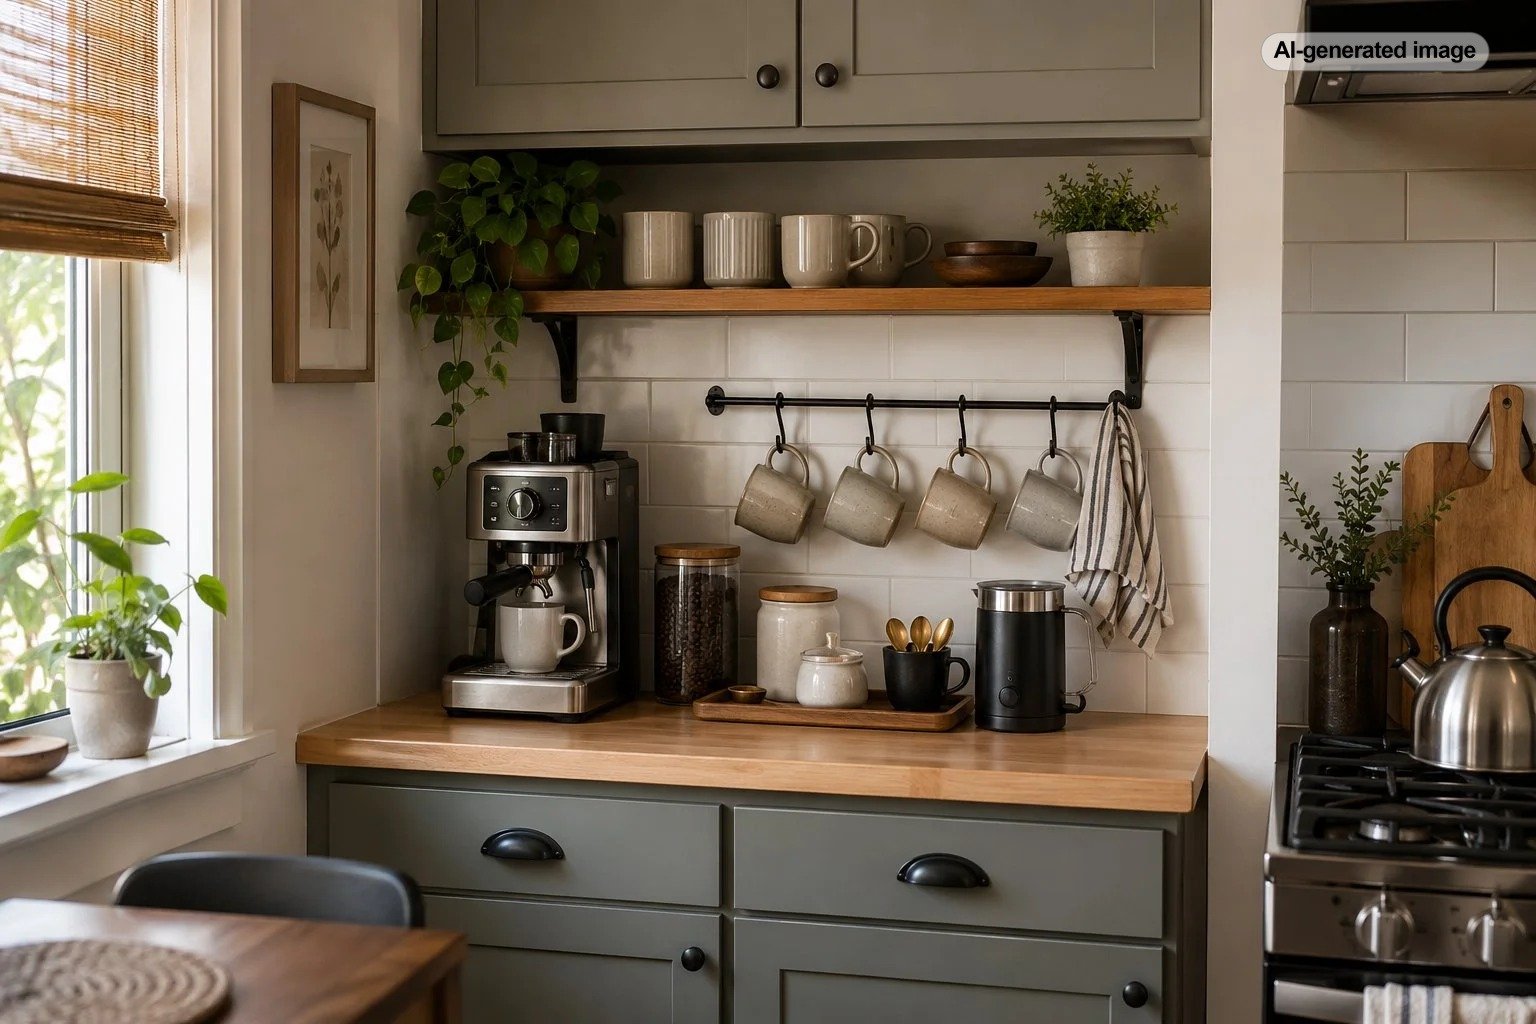
Hooks can work for a few everyday mugs, but an entire wall of hanging cups may make a narrow kitchen feel busier. Leave enough clearance so mugs do not bump the appliance or hang over an active work surface. Renters should also consider whether adhesive hardware is rated for the surface and item weight.
A narrow wall shelf can hold coffee canisters or a small row of mugs when cabinets are limited. Keep frequently handled or breakable objects within comfortable reach, and avoid placing heavy supplies on a shelf that is difficult to access safely.
| Storage location | Best for | Main tradeoff |
|---|---|---|
| Drawer | Pods, filters, scoops, tea bags, and small tools | Requires a nearby drawer that can be dedicated or divided |
| Upper cabinet | Mugs, beans, filters, and backup supplies | High shelves may be inconvenient for daily items |
| Wall shelf | Attractive canisters and a few cups | Adds visible objects and may require installation |
| Rolling cart | Kitchens with little available counter space | Uses floor space and can obstruct circulation |
| Appliance stand with storage | A compact all-in-one countertop setup | Adds height and may limit access beneath cabinets |
Protect Your Most Valuable Counter Space
Small kitchens function better when at least one section of countertop remains open. If your coffee station consumes the only practical chopping or plating area, it is probably in the wrong location or contains too much.
Consider whether a less conventional surface could work. A sturdy narrow cart, a built-in pantry shelf with an outlet, or a small cabinet just outside the kitchen may provide a better home. In a studio apartment, a compact console near the kitchen can become a beverage station while also storing linens or serving pieces.
Measure before moving the machine. Include the appliance width and depth, cord position, overhead opening space, and the area needed to place a mug. Also confirm that a cart or freestanding cabinet is stable, level, and suited to the appliance’s weight and operation.
Store Supplies According to Frequency
Daily items should be easiest to reach. Weekly and occasional supplies can move higher, lower, or farther away. This simple hierarchy keeps the station useful without requiring an organizer for every object.
- On the counter: the primary brewer and perhaps one grinder or electric kettle.
- In the nearest drawer: filters, pods, measuring tools, stirrers, and a cleaning cloth.
- In the cabinet above: everyday mugs and the current supply of coffee.
- In secondary storage: extra beans, bulk pods, guest mugs, syrups, and seasonal accessories.
Decanting coffee into a canister can make the setup look calmer, but the container should be practical rather than purely decorative. Choose one that closes securely, is easy to clean, and fits the amount you normally keep at the station. Label similar containers when there is any chance of confusing regular, decaffeinated, or flavored coffee.
Plan for Water, Grounds, and Daily Mess
Coffee stations produce drips, grounds, wrappers, and used filters. A setup that ignores cleanup will quickly feel untidy, regardless of how attractive the containers are.
Keep a small washable cloth nearby and give used pods or filters an immediate destination. If the station is far from the sink, a removable water reservoir is usually easier to manage than carrying water in an open container. A nearby mat or tray may help contain minor drips, but it should be cleaned regularly rather than hiding moisture underneath.
What to do
- Return mugs and tools to their assigned locations after use.
- Wipe splashes, loose grounds, and the drip tray.
- Refill only the coffee and supplies needed for the next few days.
- Empty waste before wrappers or grounds accumulate.
- Perform appliance cleaning and descaling according to its manual.
A one-minute evening reset is usually more effective than an elaborate organization system. The goal is to make tomorrow’s coffee easy without turning the counter into permanent storage.
Keep the Styling Simple and Useful
A coffee station can complement the kitchen without becoming a themed display. Repeating one or two existing materials, such as wood, ceramic, glass, or brushed metal, will usually create more cohesion than adding signs and novelty accessories.
Use the mugs you actually enjoy. Choose containers that fit the shelf. Add one small decorative detail only if it does not displace something functional. In a very compact kitchen, negative space is part of the design; leaving a little breathing room around the machine often looks better than filling every inch.
Cords also affect the finished appearance. Keep the cord loose enough for safe operation, but avoid long coils on the counter. Never pinch a cord behind furniture or route it where it can contact water or a hot surface.
Common Small-Kitchen Coffee Station Mistakes
The most common mistake is creating a station that looks organized but is awkward to use. A beautiful canister placed behind a heavy machine, mugs stored beyond comfortable reach, or a reservoir trapped beneath a cabinet will add friction every day.
- Keeping every mug at the station instead of selecting a small daily set
- Buying organizers before measuring the machine and cabinet clearance
- Blocking the kitchen’s primary food-preparation area
- Storing heat-sensitive items directly beside a hot appliance
- Allowing syrups, pods, and backup coffee to multiply on the counter
- Ignoring the path between the machine, sink, refrigerator, and waste bin
Another frequent problem is choosing a location solely because an outlet is present. The station must also be stable, accessible, cleanable, and compatible with the appliance instructions. When those requirements conflict with appearance, function should win.
Frequently Asked Questions
How much counter space does a coffee station need?
It depends on the machine and how it opens. Measure the appliance at its widest and deepest points, then add working room for a mug, refilling, ventilation, and cleaning. A single compact brewer may require only a narrow section, while an espresso setup generally needs more surface and storage.
Can I put a coffee maker inside a cabinet?
Only when the arrangement follows the appliance manufacturer’s instructions and provides suitable clearance, ventilation, electrical access, and protection from heat and moisture. Many people pull an appliance forward or fully out before operating it rather than running it in an enclosed cabinet.
What should stay on a small coffee station?
Keep the primary brewer and, when used daily, one companion appliance such as a grinder or kettle. Store mugs, coffee, filters, pods, and tools in the nearest drawer or cabinet whenever possible.
How can renters create a coffee station?
Use reversible elements such as a tray, drawer dividers, shelf risers, a freestanding cart, or an existing cabinet. Avoid drilling into walls or cabinetry unless the lease permits it, and confirm that any adhesive storage is suitable for the surface and load.
How do I keep the station from looking cluttered?
Limit visible supplies, use containers that fit the available scale, and leave some open space around the appliance. Move backups and occasional accessories to secondary storage, then reset the station at the end of the day.